DIY Inspiration
Here we will have a combination of DIY Ideas and DIY Projects from our own Knotties!
DIY: Cake Topper by JustPeachy89
Supplies needed:
Polymer Clay ( I recommend the soft brand)
Rolling pin
Oven
Paintbrush
Acrylic paint
Hot glue
Instructions:
Do NOT use any kitchen utensils that you would want to use again.
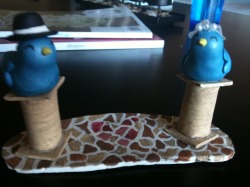
Once they have toughed polymer clay, they cannot be reused for food purposes. This is a really easy way to make a cute cake topper and save money. To make the topper pictured here it took 1 block of white clay and one block of blue. You can do any design you like from traditional bride and grooms to any creative theme you like.
1. Work Polymer Clay very well with rolling pin. It will be very hard when you first take it out even if you get the soft brand. The more you roll the softer it gets and it will be very easy to mold once your done.
2. Work clay into desired form. For the birds I recommend doing balls and pinching the tails into a tear dropped shape. Then add a second ball for the head. Smooth the neck into the body for a continuous look. 3. For the base, use the rolling pin and roll out a slab and cut the desired shape.
4. For the columns, roll out a slab and cut 4 equal sized squares and 2 equal sized rectangles. The squares are the top and base. Roll the rectangles around a finger and smooth the height ends together.
5. Bake all pieces following the instructions on the clay wrapping. I recommend putting a piece of paper at the bottom of the baking pan you put your clay in so that you do not contaminate it and can reuse it. The paper will not burn because you are baking at a low temperature.
6. Paint as desired and glue your pieces together.
Polymer Clay ( I recommend the soft brand)
Rolling pin
Oven
Paintbrush
Acrylic paint
Hot glue
Instructions:
Do NOT use any kitchen utensils that you would want to use again.
Once they have toughed polymer clay, they cannot be reused for food purposes. This is a really easy way to make a cute cake topper and save money. To make the topper pictured here it took 1 block of white clay and one block of blue. You can do any design you like from traditional bride and grooms to any creative theme you like.
1. Work Polymer Clay very well with rolling pin. It will be very hard when you first take it out even if you get the soft brand. The more you roll the softer it gets and it will be very easy to mold once your done.
2. Work clay into desired form. For the birds I recommend doing balls and pinching the tails into a tear dropped shape. Then add a second ball for the head. Smooth the neck into the body for a continuous look. 3. For the base, use the rolling pin and roll out a slab and cut the desired shape.
4. For the columns, roll out a slab and cut 4 equal sized squares and 2 equal sized rectangles. The squares are the top and base. Roll the rectangles around a finger and smooth the height ends together.
5. Bake all pieces following the instructions on the clay wrapping. I recommend putting a piece of paper at the bottom of the baking pan you put your clay in so that you do not contaminate it and can reuse it. The paper will not burn because you are baking at a low temperature.
6. Paint as desired and glue your pieces together.
DIY: Silk Flowers by goetzr19
Supplies needed:
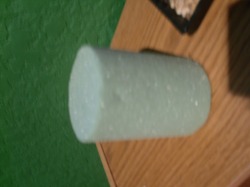
Styrofoam block (The one pictured can be purchased at Michaels for $3.49 for 2)
Floral tape/Masking tape
Thick ribbon (1" at least)
Scissors
Plastic Bag or Newspaper
Hot glue gun
1. Place plastic bag or newspaper on your work area. The foam block can become messy. Make sure to cut off any leaves that are on your floral stems low enough to interfere with the ribbon.
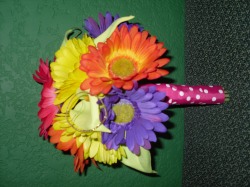
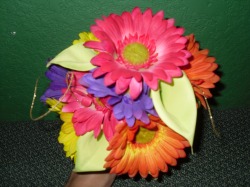
2. Gather flowers, and decide on which one you want in the center. Place that flower/flowers into the block and continue adding around the center flower. (The advantage to the foam block is that you can easily switch out flowers as long as the stems are similar sizes without messing up the bouquet.)
3. Once you get all the flowers placed where you would like, keep them in the foam block and tear off a large piece of masking tape or floral tape, enough to wrap about the bouqet two or three times to hold flowers in place.
4. Once the flowers are held in place, remove them from the foam block and continue wrapping in tape up and down the stem. You can choose to wrap a small amount, or the whole stem.
5. Place a small dab of hot glue where you are going to start wrapping your ribbon. Every few rotations around the bouquet, add a dab of glue to keep the ribbon in place. Finally, glue the end part of your ribbon to the bouqet at the end.